A reality of freshman English is that many students struggle with organization and clear development of their ideas. We use some scaffolding and acronyms to help students develop strong writing, and reinforce them throughout the year. This helps students to develop more purposeful and thoughtful writing, which provides a strong foundation to build off of throughout the year.
To help students reflect on organization, many teachers ask students to deconstruct or reconstruct writing samples. Simply cut up a model paragraph or work and have students reconstruct it, organize it, and reflect on their choices. My coteacher and I decided to take that to the next level, inspired by use of Google Slides and Google Draw for magnetic activities.
To learn more about these magnetic activities, check out my article on our use of Halloween Magnetic Poetry, inspired by Kasey Bell’s original post here. Eric Curts also explores these strategies in his awesome Build a Snowman with Google Slides and Wintertime Magnetic Poetry with Google Drawings.
Magnetic Puzzle Poetry
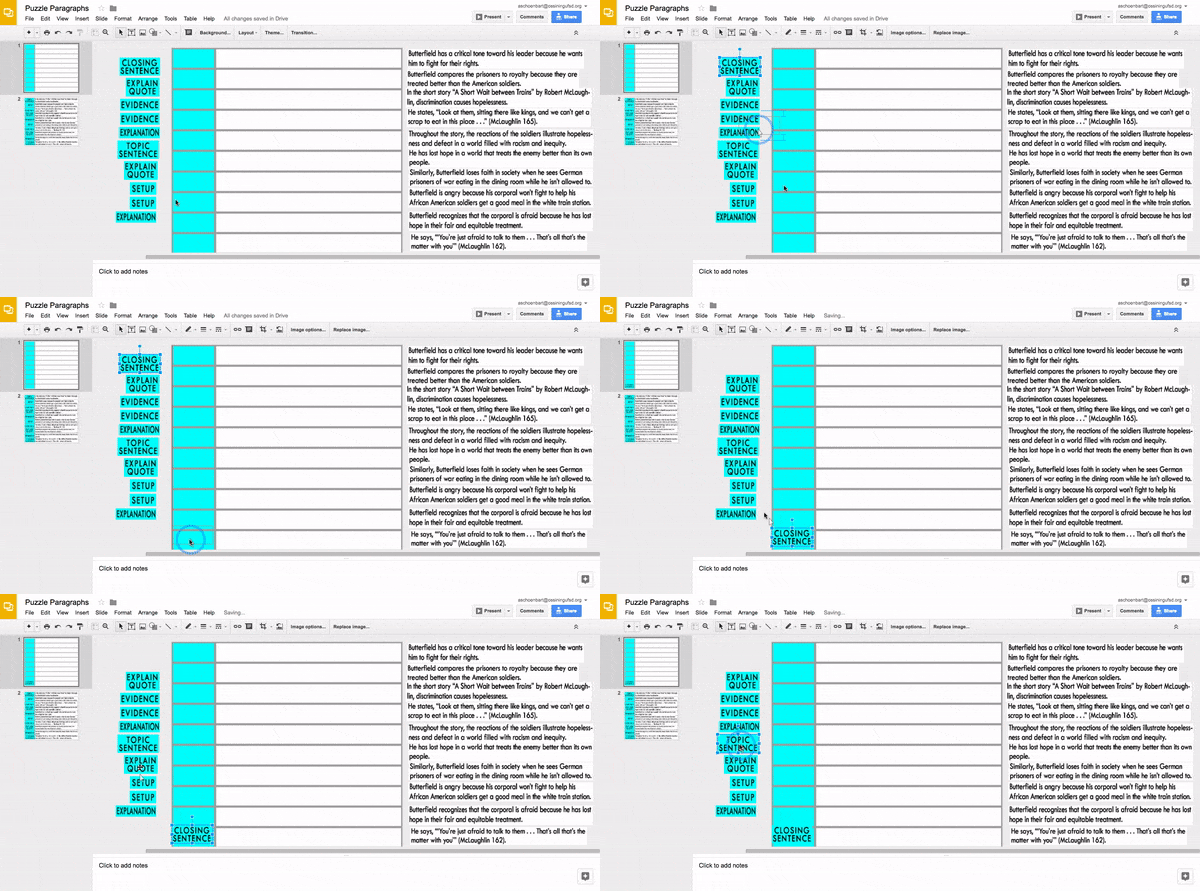
We wrote a sample paragraph, modeled on student work. Earlier in the week, they outlined one in class, making the sample more authentic to their writing. Then, using Google Slides and the Nimbus Screenshot Chrome Extension, I cut the paragraph up into its parts, mixed it all up, and asked students to reconstruct it. See the animation below for an example of how it worked or click here to make a copy of the slides for yourself.

Students collaborated to reorganize this paragraph, and you can see the end result on slide 2 above featured at the end of the GIF.
Then, students reflected on Google Classroom. Being able to organize and reorganize the piece was great, but this reflection of their process and understanding was essential. Students were asked to improve one part of this paragraph by rewriting the sentence and explaining why they made this choice.
Magnetic How To
Adapting the magnetic activity to your own class is easy with Google Slides or Draw and any screenshot tool. Instead of creating screenshot images, you can also insert different text boxes to the slides, too. I chose the images so students couldn’t edit the text.
To create a background, like my grid, right click on a slide and change the background to an image. I created the grid right in Slides and downloaded it as a .jpg. Then, I uploaded the image and set it as my slide background.
After screenshotting the parts of the paragraph and labels, I simply moved them to the left and right of the slide and mixed up the order. Then, on Classroom, I assigned the file by making a copy for each student. In the end, students can turn in the work and can also download their work from Slides or Draw as an image to share.
Magnetic activities like these are great for fun and creative tasks like magnetic poetry and to work on organization skills. Right now, my students need the structure that this activity provides, giving us a nice starting point for more sophisticated writing and new choices in the future. I also like the idea of students being able to download their work and share it on social media, like we did with our Halloween Magnetic Poetry.
How have you used Google Slides or Draw in your classroom? Share your lessons or activities in the comments or on Twitter @MrSchoenbart.
cross posted at www.aschoenbart.com
Adam Schoenbart is a high school English teacher, Google Education Trainer, and EdD candidate in Educational Leadership. He teaches grades 10-12 in a 1:1 Chromebook classroom at Ossining High School in Westchester County, NY and received the 2014 LHRIC Teacher Pioneer Award for innovative uses of technology that change teaching and learning. Read more at The SchoenBlog and connect on Twitter @MrSchoenbart.

